Pages

Total Pageviews

Tuesday 30 August 2011

Microsoft Windows 7 - All Versions - 100% Working

A lot of people are searching for Windows 7 Cracks, Serials, Key-Generators but have no luck in getting one that works. This link that I'm posting is the Full 100% working Windows 7 Library for both 32-Bit and 64-Bit based systems. There is an embedded Patch that disables the need for a Serial Key Confirmation, which in other words allows you to instantly install the program to your hard drive without issues. The great thing about this program is that you can still Update the system as many times as you wish, since there is a shielded patch that tells Microsoft that you own a legit copy. As much as this is a great deal, I still disable automatic updates so that I stay cautioned "Just in case". I suggest you do the same, because as you install the program for the first time, Auto-Updater will be automatically turned on, and will prompt you to update every time it finds one (this only works if you're connected to the internet).

This download includes the following Windows 7 Operating Systems (All are 64-Bit):
- Starter (32-Bit)
- Home Basic (32 / 64)
- Home Premium (32 / 64)
- Professional (32 / 64)
- Enterprise (32 / 64)
- Ultimate ( 32 / 64)
NOTE: For the specific information on any of the OS above, check the link below:
Windows 7 OS Description

Windows 7 System Requirements:

If you want to run Windows 7 on your PC, here's what it takes:
1 gigahertz (GHz) or faster 32-bit (x86) or 64-bit (x64) processor
- 1 gigabyte (GB) RAM (32-bit) or 2 GB RAM (64-bit)
- 16 GB available hard disk space (32-bit) or 20 GB (64-bit)
- DirectX 9 graphics device with WDDM 1.0 or higher driver
PCs with multi-core processors:
Windows 7 was designed to work with today's multi-core processors. All 32-bit versions of Windows 7 can support up to 32 processor cores, while 64‑bit versions can support up to 256 processor cores.
PCs with multiple processors (CPUs):
Commercial servers, workstations, and other high-end PCs may have more than one physical processor. Windows 7 Professional, Enterprise, and Ultimate allow for two physical processors, providing the best performance on these computers. Windows 7Starter, Home Basic, and Home Premium will recognize only one physical processor.


This release has integrated RemoveWAT 2.2.6.0.
This tool completely removes Windows Activation Technologies from your system and your Windows will be fully activated and fully updateable, plus, you won’t have to worry about malicious updates (KB971033) which can deactivate your copy of Windows.
IT RUNS AUTOMATICALLY AND SILENTLY AFTER SETUP.


Installation Instructions:
1. Once you download all required parts, you will need to extract all the RAR files with WinRAR.
    If you don't own WinRAR you can download it for free from http://www.download.com .


2. To view the "ISO" file, you will need a program that can read Video Images like MagicISO or
    Daemon Tools. There is many more but these are the ones that I use. To download them, just
    search in Google and you should be able to find a Free Download.
    NOTE: I will post a download link as well for MagicISO.

3. With MagicISO Extract the image file to desired folder and Burn the contents with any burning
    software onto a DVD as Data files. Or you can just burn the ISO file onto the Disk since Windows
    should be able to read from the disk.


4. When Completed the Burning, Restart the computer.
    NOTE: Leave the Disk Inside the drive as u will be booting from the disk.

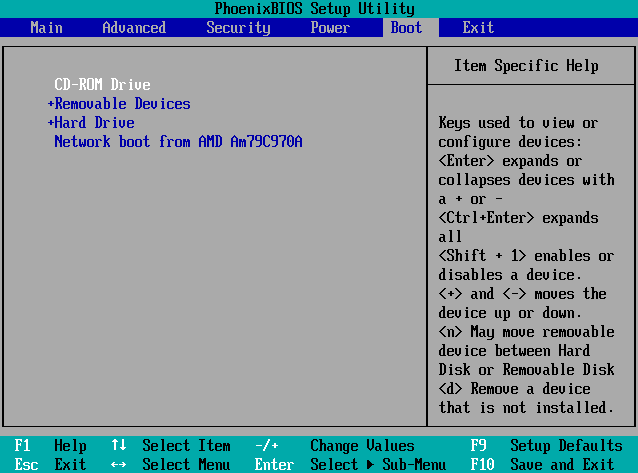
5. When the computer starts powering up, on your Keyboard hit Function 2 [ F2 ] (This must be done before
    it starts to load your original operating system) and you should be in the BIOS Menu. Scroll using the
    Arrow Keys on your keyboard (Mouse will be disabled while in BIOS) and hover over "BOOT". I can't
    be certain what the actual Sub Folder is named, but you will have to change how the system boots. In
    order to install the Windows 7 Program, you will have to change the boot priority to boot from "your
    CD/DVD-Rom Drive" which might have a different name. Mine is called: "HL-DT-ST DVDRAM
    GH24NS50 ATA Device", but yours might be different name or it might be same, either way you will have to make that drive to be Priority #1 or 1st Boot.
     NOTE: You can disable your Hard-Drive because you wont be booting from it anyhow, or you can
                  leave it as is, it doesn't really matter that much.


6. When everything is finalized, click the appropriate Function Key that says "Save and Exit", and the
    Windows Installation will begin. You must go through all the installation steps on your own. While
    in the installed a Library Box will appear with more than one Operating System of Windows 7.
    Select the one u wish to install and Complete the installation.
    NOTE: If it prompts you to enter Name and other personal info, considering this is a Hacked
                version, I wouldn't put a real name nor address or any other personal info. In other words
                make everything up!

7. Once your Windows 7 Installs, it will automatically search for updates. Let this happen since it will
    restart as many times as needed.

8. Once everything is complete, Restart your computer, and as it starts to BOOT press [ F2 ] on the
    Keyboard and you must change the BOOT to have the first priority to the Hard-Drive.

NOTE: Keep in mind, even though this is a Full Version, and it allows you to Update, it's strongly
            suggested to turn off the Automatic Updater so that you can see what you wish to update.


Download Link:
PART 1
PART 2
PART 3
PART 4
PART 5
PART 6
PART 7
PART 8
PART 9
PART 10
PART 11
PART 12

NOTE: I will be uploading in other File Sharing Sites as well for a much better convenience.

Saturday 27 August 2011

Adobe CS5 Downloads [FS]

Keep in mind that some of these links will give more than just the single program. Other mini programs may also be installed upon request of the Installation Pop-Up. For Instance, I have the 4 Programs Listed Below but when I installed everything completely I also got these programs:
- Bridge CS5
- Device Central CS5
- ExtendScript Toolkit CS5
- Extension Manager CS5
- Media Encoder CS5
- Photoshop (x64-Bit) CS5
- PixelBender Toolkit 2

All the Links Below are to be opened up with WinRAR. If you do not have this program, you can download it for free from:
              http://www.download.com/

.Photoshop CS5: Extended
http://www.filesonic.com/file/r000216945/1749940821/Adobe_Photoshop_CS5_Extended.part01.rar
http://www.filesonic.com/file/r000216945/1749940831/Adobe_Photoshop_CS5_Extended.part02.rar
http://www.filesonic.com/file/r000216945/1749940861/Adobe_Photoshop_CS5_Extended.part03.rar
http://www.filesonic.com/file/r000216945/1749940851/Adobe_Photoshop_CS5_Extended.part04.rar
http://www.filesonic.com/file/r000216945/1749940881/Adobe_Photoshop_CS5_Extended.part05.rar
http://www.filesonic.com/file/r000216945/1749940871/Adobe_Photoshop_CS5_Extended.part06.rar
http://www.filesonic.com/file/r000216945/1749940911/Adobe_Photoshop_CS5_Extended.part07.rar
http://www.filesonic.com/file/r000216945/1749940891/Adobe_Photoshop_CS5_Extended.part08.rar
http://www.filesonic.com/file/r000216945/1749941001/Adobe_Photoshop_CS5_Extended.part09.rar

.Dreamweaver CS5
http://www.filesonic.com/file/r000216945/1747312911/A.D.CS5_Full.rar

.After Effects CS5
      PART 1:  http://www.filesonic.com/file/r000216945/1747325351/Adobe_After_Effects_
      PART 2:  http://www.filesonic.com/file/r000216945/1747325421/Adobe_After_Effects_
      PART 3:  http://www.filesonic.com/file/r000216945/1747325491/Adobe_After_Effects_

.Fireworks CS5
      PART 1:  http://www.filesonic.com/file/r000216945/1715734221/Adobe_Fireworks_CS5_v11.0_
      PART 2:  http://www.filesonic.com/file/r000216945/1715734231/Adobe_Fireworks_CS5_v11.0_
      PART 3:  http://www.filesonic.com/file/r000216945/1715734281/Adobe_Fireworks_CS5_v11.0_
      PART 4:  http://www.filesonic.com/file/r000216945/1715734271/Adobe_Fireworks_CS5_v11.0_

LAST DATE LINKS WORKED: October 1, 2011 @ 07:00 AM

For help with Installation visit this page:
-> http://adobe-cs5-4free.blogspot.com/2011/08/adobe-cs5-serial-language-pack.html <-

Thank You 4 Viewing!

Friday 26 August 2011

Adobe CS5 Serial & Language Pack & Trial Upgrade (NEW! Mac Version at Bottom)

Hey Guys,

I got a serial key-generator that works for all products of Adobe CS4 & CS5. This is perfect as well if you have the whole Production / Masters Collection because this KeyGen got the Serials for any Adobe product. I'm using Windows 7 and it worked for me, but I can't confirm that it'll work for Mac OS.

*IMPORTANT* You do not need to make an Adobe Live ID. This is only if you want to seek Adobe
                            support. With these patches, you will be able to freely Update any Adobe Program!

In order to extract this file, you will need "WinRAR" its a free-base program that you can download from http://www.download.com/ :

DL Link:  -> Click Here! <-

Installation:
1. The main thing to do is disable your internet connection, whether by going to your Network Folder and
    clicking the Disable Internet Connection to the proper Ethernet; or simply just pull the Ethernet Cable from
    your computer.


2. Replace the "hosts" file with the one provided in the RAR Folder. All you do is 'COPY' the file from the
    RAR Folder and 'PASTE' to the specified directory. To get to the hosts file, you will have to go to here
    (for Windows Users):                        C:\Windows\System32\drivers\etc


3. Run the KeyGen and Copy/Paste the Generated Serial Number into Adobe. Finish the Installation.
    NOTE: You don't have to restart right away, it'll still work.


4. Before you open the Adobe CS5 program, you have to Copy & Re-Place the .DLL file provided
    ("amtlib.dll"). If you have more than 1 Adobe program that you wish to crack, you will have to Copy/Paste
    the .DLL file into each of the file's main directory in the Adobe Folder. For Example:

C:\Program Files\Adobe\Photoshop CS5\


5. Open up desired Adobe program, and enjoy the Full Version.


Language Packs:
DL Link:  -> http://www.khalidtsouli.com/2011/05/20/how-to-change-the-interfaces-language-of-your-adobe-cs5/  <-
Direct:     -> http://www.4shared.com/dir/oq_44TGD/Adobe_CS5_Language_Pack_Series.html <-

Installation:
1. Download the desired Language Pack, and run the .EXE file (no this is not a Virus) you have to run the
   .EXE file in order for the language pack to install in the correct folders and directories.
   NOTE: You have to have the desired Adobe program installed prior to installing the Language Pack(s).
2. In the Adobe directory choose your program (for example Photoshop CS5); if you had a french version,
    you might see a folder "fr_FR" or "en_EN" or you might see "French" or "English"; you must delete the
    folder with the language you wish to change in order to make full effect of the Language Pack. For
    Example:
          "if your default language is French and you want to install the English Pack, after you install the pack
           you will see both the English and the French Folders. Delete the French permanently."
3. Open up Desired Adobe program and you should see the language change!


Upgrading Trial Version (x64 Systems ONLY "64-Bit"):

Installation:
1. Close any open Adobe Program and then Open the Patch Folder.
2. Copy and paste the "amtlib.dll" into the desired Adobe Folder(s).
    NOTE: If it asks to replace the file, Confirm by replacing/overwriting it.
3. Double-Click on "disable_activation" file.


4. Open Adobe Program
5. Update Adobe Program
    NOTE: This can take anywhere from 5min - 1 or more hours.


FOR MAC OS-X USERS:
NOTE: I do not own a MAC so I can't help you further than what I have posted.

1. Disconnect from the Internet before proceeding with the installation.

2. To change the Hosts FILE these are the Instructions taken from another site:


Step 1 – Open the Terminal.app
Either by start typing Terminal on the Spotlight, or by going into Applications -> Utilities -> Terminal.
Step 2 – Open the hosts file
Open the hosts by typing on the Terminal that you have just opened:
1$ sudo nano /private/etc/hosts
Type your user password when prompted.
Step 3 – Edit the hosts file
The hosts file contains some comments (lines starting with the # symbol), as well as some default hostname mappings (e.g. 127.0.0.1 – localhost).
Simply append your new mappings underneath the default ones. Or edit one of the default values if you know what you are doing!
You can navigate the file using the arrow keys.
Step 4 – Save the hosts file
When done editing the hosts file, press control-o to save the file.
Press enter on the filename prompt, and control-x to exit the editor.
Step 5 – Flush the DNS cache
On Leopard you can issue a simple Terminal command to flush the DNS cache, and have your host file changes to take immediate effect:
1$ dscacheutil -flushcache
You can now test your new mapping on the browser!


OR you can go to this YouTube Video for a better look: Click Here!


3. Go here for the KeyGen Download > Download <

4. Run the Adobe "desired software" Install.

5. In the KeyGen, generate a CD KEY and paste it into the Serial Key Prompt box in the adobe installer (when asked to do so).

6. After Installation, you may be asked to Subscribe to adobe to get your Adobe ID! DO NOT do this as it is not necessary nor needed. That's only for customers that purchased the original version.
-------------------------------------------------------------------------------------------------
Thanks For Viewing, and I hope this works for everyone. For any further questions please feel free to email me @ Click Here!